Showing posts with label code 3. Show all posts

Saturday, July 21, 2012

Matchbox SRT Viper - Code 3


The Mattel design team have made some very controversial decisions for the 2012 Matchbox range. They have delivered a selection of garish designs and odd generic models which have not proved popular in the adult collector community. One hopes that their core audience - kids who play with these cars - are happy, and that sales have boomed as a result. 

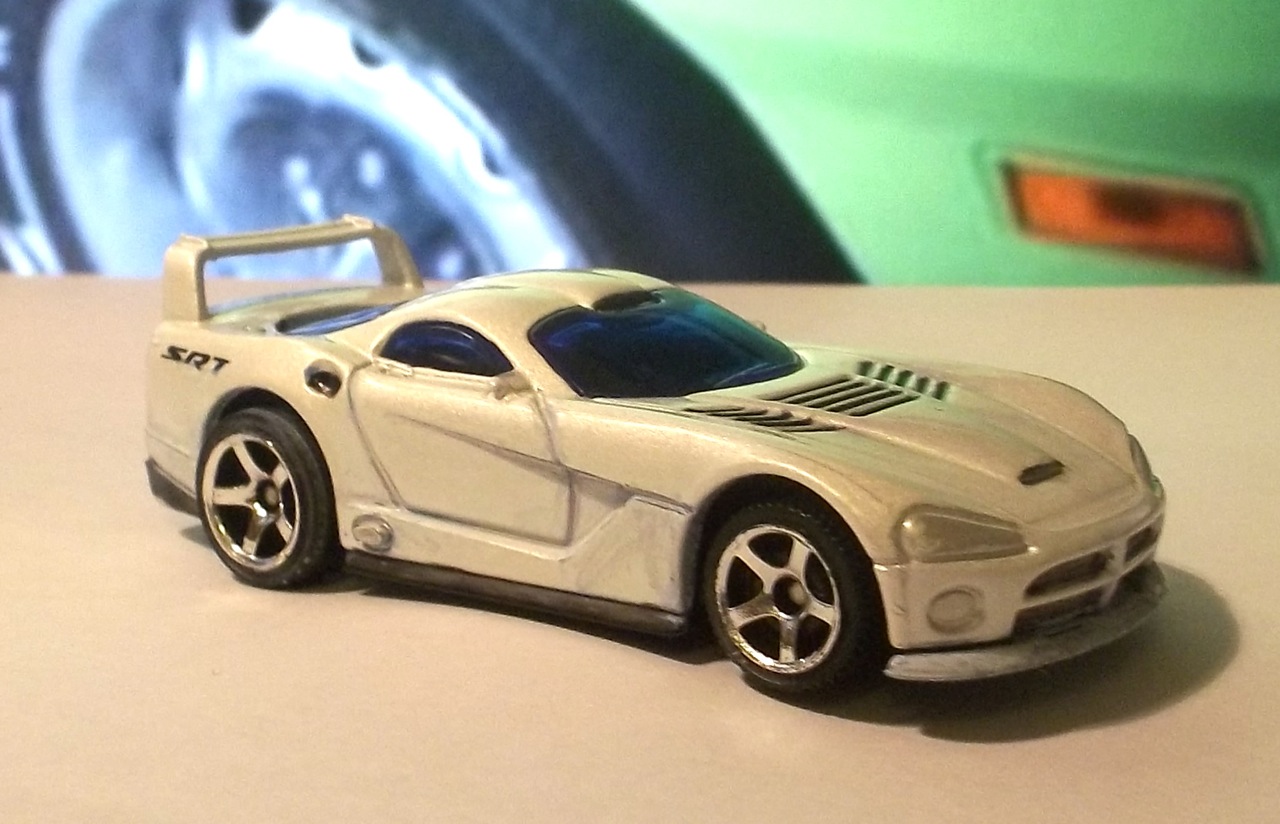
One casting that suffered spectacularly from this design decision was the Dodge Viper. I decided to 'improve' the Matchbox teams colour choice, by stripping the garish tampo, and detailing the car. This is a fairly light Code 3 of this car, with glass and wheels untouched. 
I used nail polish remover and some earwax remover buds to remove the tampos. This took some time and as i decided to keep the SRT signage, i had to be extra careful. I did rub a little too hard and too long at one point and removed some of the pearl white paint in one area. it was carefully touched up and cant be seen now. 
With the main garish blue tampo removed, I used a silver paint pen to detail the exhaust, door mirrors and headlights. Red paint on a fine brush was applied to the brake lights and the brake light above the rear windscreen. Below the rear brake lights I used the silver paint pen to highlight the reflector part of the brake light array and the numberplate area. I went over the external edge of the rear lower spoiler with a white paint pen. 
A black paint pen was used to fill in the vent above the main bumper, the grilles in the bonnet and the four radiator holes in the main front bumper. There is also an air vent just above the windscreen on the roof which also had a touch of black paint arrived. 
In this view you can see where the silver paint pen was also used on the fuel filler caps on the rear deck. White paint was used on the front spoiler, but has come up gray. I may strip that paint off, but it was the only element of this minor Code 3 job I am unhappy with. The underlying pearl white paint is very attractive. 

If you are unhappy with the main design theme on this years matchbox range, I recommend you apply my approach to your favoured casting. Check back here for my take on the VW Amarok. 

Tuesday, March 13, 2012

Canberra Downhill Diecast Dragracers - Round One

After constructing a Hot Wheels racing track - you need somewhere to race it. As a member of the Canberra Model Vehicle Collectors Club, I decided to take it along to the March meeting and set it up and have at it. Two other people had expressed interest - and I had two cars mailed to me by 'Model40fan' at the Redline Racing Forums. Four people is enough for a competition!
The track laid out and all components joined together.  If you look, you can actually see two little cars that have just exited the starting gate.
 There were a few kinks - such as this MAJOR one - and of course, I didn't have a stanley knife to trim it.
The towel is to catch cars that have exited the track after going through the finish line. You can see here where the vintage track meets the contemporary Hot Wheels track (the pieces on the blue painted plank).
Because of the kinks, including some sections where track joined, a few cars tumbled off the track - such as the Hot Wheels Volkswagen Type 181. It was a fast car - but the track needs some improvements.
Half Packid (US Import) vs Matchbox 'Tyre Fryer'

One solution on the night was to lower the track a little. I had the track elevated about a metre to start with, but too many cars came off the track, as gravity, a bumpy track etc caused them to exit the tracks... so we lowered the starting gate to chair seat level. This helped considerably. 
After watching us race, Sam decided to get involved - he had bought along some cars to swap/sell - and came over with this Matchbox Viper. It was pretty quick.
 Viper vs Half Packid (US import)
 Hot Wheels Corvette vs Majorette Morgan
 McDonalds Hot Wheels 32 Roadster vs Matchbox Dodge Monaco
 Hot Wheels Studebaker Avanti vs Matchbox Holden Ute
 Hot Wheels Corvette vs 'Blue Spruce' (US import)
Blue Spruce vs Matchbox Holden Ute
 McDonalds Hot Wheels Go Kart vs Hot Wheels Studebaker Avanti. 

This is the original configuration of the track, with the starting gate raised just over a metre. The starting angle also seems too steep. The other problem is that although there is one button to start races, some cars seem to 'hang' at the gate and not race away. Advice is sought. 

 Matchbox Holden Ute vs Matchbox Ferrari Testarossa. Cars are 'staging' off to the right. 

Lowering the starting gate and the angle of the track, was a partial solution to the problem with cars tumbling off the track. It still didn't stop some cars flying off when they encountered that large bump in the track. 
This is where the two main parts of the track - two 1.8 metre planks - are joined by a hinge, and the four lengths of plastic track join. If I'd had a Stanley knife I could have fixed this kink, but alas I didn't... The wooden guides are not decorative - there are holes drilled through them, into the plank at the front and pins hold the plank on the right in place. You can see some construction photos here.

Racing results (winners Bolded)

Half Packid (US Import) vs Matchbox 'Tyre Fryer'
Matchbox Viper vs Half Packid (US import)
Hot Wheels Corvette vs Majorette Morgan
Hot Wheels Corvette vs Matchbox Holden Ute
Hot Wheels Volkswagen Type 181 vs Matchbox Holden Ute
McDonalds Hot Wheels 32 Roadster vs Matchbox Dodge Monaco (both DNF)
Hot Wheels Studebaker Avanti vs Matchbox Holden Ute
Hot Wheels Corvette vs 'Blue Spruce' (US import)
Blue Spruce vs Matchbox Holden Ute
McDonalds Hot Wheels Go Kart vs Hot Wheels Studebaker Avanti (both DNF)
Matchbox Holden Ute vs Matchbox Ferrari Testarossa
Blue Spruce vs Half Packid
Matchbox Ferrari Testarossa vs Blue Spruce 

And the winner: 
Congrats to Model40fan and the visiting 3 inch sized American contingent!
(the car has a very cool resealable blister and its own printed card!)

Conclusions
  1. I need to fine tune the track - remove the kinks, straighten the left hand track in one place.
  2. The starting gate needs work
  3. I need to experiment with a height to start the cars from
  4. Narrow cars do not race well (Avanti, Monaco)
  5. Cars with weight at the back do race well

Between now and the next race (probably the April meeting of the Canberra Model Vehicle Collectors Club ) I will work on improving the track. If anyone has advice - please post it in the comments section. 

Oh - Big thanks to Sue who raced around collecting cars that tumbled off the track and also returned cars back to the starting gate... even after her Corvette exited the comp! It was also her idea to lower the starting gate height!

And if you want to race - let me know! 

Friday, December 9, 2011

Questions answered - Code 3 acquisition by a non-collector

Occasionally I receive emails from people with questions about models, so I've decided to post the odd one every now and then. The first one is from 'Sarah'. 

Hi there,

I have been searching for ages for a model replica of the :
"CODE3 TRAX TR12B HOLDEN HZ PANEL VAN PETER BROCK RALLY SUPPORT VEHICLE 'MARLBORO' WITH BULL BAR AND ROOF RACK 1.43 SCALE"
And am hoping you might be able to help me.
I'm looking for it for my partner, and I myself do not know much about this sort of thing.
I look forward to hearing from you, if you have any questions please let me know.

Thanks,
Sarah

Hi Sarah,

That is a Code 3 model, which means its not an official Trax model, but one that a person has modified to be a Peter Brock support vehicle. The original Trax TR12B is a HZ Holden panel van in red with Ampol livery. 
Trax TR12B Holden HZ panelvan in Ampol livery. Released in 1993

I'm not familiar with the Code 3 model in question, but in my experience Code 3 models vary in quality from amateurish to exceptional. My advice is to actually hold it in your hand and assess the quality with the naked eye before handing over your money. Even I have been fooled with photos of a code 3 model which looked great - and when the model arrived I then saw how poor it was. 

Sunday, January 30, 2011

Hot Wheels Custom 62 Chev Pickup - Code 3 - Part 1

According to the Hot Wheels Wiki:
The Custom '62 Chevy was designed by Hot Wheels Designer Rob Matthes for the 2008 New Models Series. This great casting features a chrome pick-up bed with a small slot in it to hold a surf board steady. Hot Wheels Collectors were blown away by Robs' design. The Custom '62 Chevy has become one of the most collected and sought after castings in 2008 and it's easy to see why.
I quite like the shape of this casting, and while not a big fan of pickups or utes, I do like flatbed towtrucks. I looked at the 62 Chev, looked at the Back Slider and a metaphorical incandescent light globe went off above my head. I would build a flatbed towtruck! 
The donor casting, a Custom 62 Chev from the 2009 Rebel Rides series. 
Here is the clean and tidy work area. Since this, I have built a dedicated workbench. I used a small saw to cut the bed off, in fact I had two attempts as I wasn't satisfied with attempt 1. Fortunately this proved to be beneficial as once I measured the flatbed - and the car the completed towtruck would carry (which shall remain a surprise for now) I realised this baby would need to be a 6 wheeler, lest it look foolish and just weird. 
 This helps to get cuts straight. I know I should use a dremel tool, but sometimes Im old school. 
 This is attempt 1, note the roof and cabin cuts aren't quite straight. To the wreckers yard!
Attempt 2 - much better. Reassembled with interior and partial base. In the upper right hand corner you can see the two rear wheel sets, carefully trimmed and glued together. The cabin and wheels are resting on a piece of paper I sketched the flatbed wraparound on, several times. I will cut it out and then transfer it to 0.5 mm plastic card when I am satisfied with the design, but thats a bit premature.
The flatbed towtruck tray, donated from a Hot Wheels Back Slider. It has been shortened slightly, to suit the car it will be moving around, and also so that the 62 Chev didn't look too ridiculous. Its going to be slammed low, so it doesn't need any more help. 
Getting the wheelbase right took several attempts. I have carved a temporary chassis section in balsa wood. When I'm happy I will transfer the dimensions to plastic square tubing and make a pair of chassis rails to support the flatbed. 
At the end of the first session I had separated the cab from the bed, cut down the Back Slider tray, figured out a wheelbase, joined the two rear wheel assemblies together and sketched up some rear wraparound designs. 

Now I need to buy some paint and plastic sheet. Come back for Part Two soon.

Saturday, May 29, 2010

Code 3 - Maisto VW Type 3 Wagen - part 1

My friend Glenn and his son have taken this VW Type 3 Wagon to the last two Summernats. Its a nice car, and they have a lot of fun cruising around in it. It was a father and son project, so means a lot to both of them. 
So when i saw a VW Squareback hanging on the shelves of Toys'r'Us I decided to build a tribute to my friend and his son. Im in the 'acquiring parts needed' stage at present. My next post will be on the strip down. And for blog reader Russ - this car is 1:64...

Friday, October 16, 2009

Code 3 - A short guide to diecast car 'codes'

Every subculture has its own jargon, or shorthand. It occurred to me that some people may not know what a 'Code 3' diecast model is. A brief rundown on terminology follows.

The 'codes' relate to the condition and modifications on a particular model.

Code 1 : A standard model as it comes from the manufacturer. Only ever called a Code 1 in a guide like this.

Code 2 : A standard model from the manufacturer but with differences in packaging or badging. An example could be a promotional model of a Trabant made for say Capital Diecast Garage by the manufacturer, and I decide to rebox it or apply an extra sticker to it. Another example is the application of aftermarket decals to models such as Brock HDT Commodores that are produced without tobacco company signage in accordance with legislation.

Many people collecting Brock cars are unwittingly becoming Code 2 artists, when they purchase decals from places such as Pattos Place to ensure that the model they have is accurate and not inaccurate.

Code 3 : Massive changes made to the appearance of the model without the permission of the manufacturer. This can include new or different decals, changing the paint scheme, different wheels, swapping components, or a massive redesign using a base model and turning it into something different. Some Code 3's are good quality, and others atrocious.


Code 3 from 'Santers Workshop' note poor painting of detail, inaccurate paint around upper doors and sloppily applied decals. Even the wheels are wrong, I doubt a taxi ever used Targa Florio mags! It looked OK in the Ebay ad. Caveat Emptor. 

If you are offered or buy a Code 3, you should be advised that it is a Code 3 and not represented as a factory original version of a particular model. That is fraud.

Some people like collecting Code 3's and others frown upon it. My opinion is that as long as its not represented as something it is not, then enjoy the Code 3. You can find interesting examples of cars which you might never see if someone hadnt attempted to Code 3 a car.


  Original Trax P76 at top, Code 3 at bottom of photo. Correct colour paint for Yellow Cab, but sloppy detail work has ruined this model.